Plupload Custom File Upload UI

Plupload is a tool that allows you to upload files using HTML5 Gears, Silverlight, Flash, BrowserPlus, normal forms, and provides features such as upload progress, image resizing and chunked uploads.

So I’m gonna discuss the process I went through to implement a custom Plupload UI.

Here is a video off it in action:

Now I’ll go into details on how it was built using the Plupload framework.
I modeled my version of the plupload custom example here.

So first of all I Init an instance of plupload and set the options. I set the drop area, and the container that the file progress will be displayed in.
Note: Only FF and Chrome support drag’n drop in Plupload.

$(document).ready(function(){
var uploader = new plupload.Uploader({
	// General settings
	runtimes: 'html5,flash,gears,browserplus,silverlight,html4',
	url:<%= SaveUrl %>,
	browse_button : "pickfiles",
	button_browse_hover : true,
	drop_element : "dropArea",
	autostart : true,
	max_file_size: '100mb',
	container: "FileContainer",
	chunk_size: '1mb',
	unique_names: true,
	// Flash settings
	flash_swf_url: <%= "'"+  Page.ResolveUrl("~/plugins/plupload/plupload.flash.swf") +"'" %>,
	// Silverlight settings
	silverlight_xap_url: <%= '"'+ Page.ResolveUrl("~/plugins/plupload/plupload.silverlight.xap") +'"' %>
});

Plupload doesn’t automatically hide the drop area when the current browser doesn’t support it so I bind some custom logic to the plupload “Init” event below. Drag and drop support requires that the browser support FileReader and will not work under the flash or silverlight runtimes.

uploader.bind('Init', function(up, params){
try{
    if(!!FileReader && !((params.runtime == "flash") || (params.runtime == "silverlight")))
         $("#dropArea").show();
         $("#fileSelectMsg").hide();
    }
catch(err){}});
uploader.init();

So now we need to be able to display files in our “FileContainer” div the script below fires on the FilesAdded event. It is called when a file is added or dropped in the drop area. When this event is fired I create a div that contains the elements we will need to display upload progress and the name of the file.

uploader.bind('FilesAdded', function(up, files) {
	$.each(files, function(i, file) {
		$('#filelist').append(
			'<div id="' + file.id + '" class="fileItem"><div class="name">' +
			file.name + '</div><a href="#" id="cancel'+file.id+'" class="cancel">cancel</a><div class="fileInfo"><span class="size">' + plupload.formatSize(file.size) + '</span>' +
			'<div class="plupload_progress"><div class="plupload_progress_container"><div class="plupload_progress_bar"></div></div></div>'+
			'<span class="percentComplete"></span></div></div>');

		//Fire Upload Event
		up.refresh(); // Reposition Flash/Silverlight
		uploader.start();

		//Bind cancel click event
		$('#cancel'+file.id).click(function(){
			$fileItem = $('#' + file.id);
			$fileItem.addClass("cancelled");
			uploader.removeFile(file);
			$(this).unbind().remove();
		});

		//Set ico_Ok to Uploading
		$confirmNext.attr("disabled", "disabled");
		$confirmNext.html("Uploading..");
		$confirmNext.unbind("click").click(function(e){e.preventDefault();});
	});
});

Now that we have files uploading we need to update the progress bars for each file div in the “FileContainer”. So yet again Plupload conviently has an event called “UploadProgress” that fires after each chunk has been successfully uploaded.

uploader.bind('UploadProgress', function(up, file) {
	var  $fileWrapper = $('#' + file.id);
	$fileWrapper.find(".plupload_progress").show();
	$fileWrapper.find(".plupload_progress_bar").attr("style", "width:"+ file.percent + "%");
	$fileWrapper.find(".percentComplete").html(file.percent+"%");
	$fileWrapper.find('#cancel'+file.id).remove();
});

So now we have files uploading and being added to the container and updating the upload progress in real time. So now I want to grey out the div once the file has been completed. In order to do this I add a class to that file’s div. The “FileUploaded” event gets fired after each file is successfully uploaded.

uploader.bind('FileUploaded', function(up, file) {
	$fileItem = $('#' + file.id);
	$fileItem.addClass("completed");

	$confirmNext.removeAttr("disabled");
	$confirmNext.html("Ok");
	$confirmNext.unbind().click(function(e){window.location.href = window.location.href;});

	$('#cancel'+file.id).unbind().remove();
});

Last but not least I’ll show you how to display errors that happen server side when a chunk is uploaded. On “ChunkUploaded” event I check the response message if it contains “Error:” in the response string. I kill the current upload and display that error message to the user and also log the error in my application. The following snippet performs just this.

uploader.bind("ChunkUploaded", function(up, file, response){
	//Should return a status 200 if the chunk was uploaded successfully
	if(response.status != null)
	{
		if(response.status != "200" || (response.response.indexOf("Error") != -1))
		{
			if(response.response.indexOf("Error") != -1)
			{
				//Prompt the user with the custom error message
				$("div.error:first").show().html('<p>'+response.response+'</p>');
			}
			else
			{
				//Log this as an error
				//Custom line of code to log error on server would go here
				
				//Notify user of error
				$("div.error:first").show().html('<p>There was an error uploading your file '+ file.name +' Support has been notified.</p>');
			}
			$('#' + file.id).addClass("cancelled");
			uploader.stop();
		}
	}    
});

So thats how I built my custom UI wrapper around the Plupload core. Hopefully that will help get you going in the right direction.

Selenium Regression Testing Part II – Tips and Tricks

Add to FacebookAdd to DiggAdd to Del.icio.usAdd to StumbleuponAdd to RedditAdd to BlinklistAdd to TwitterAdd to TechnoratiAdd to Yahoo BuzzAdd to Newsvine

In my last post, I talked about how you can use Selenium to do real regressions tests for web applications. It’s a great way to automate testing the real user experience, and not just the backend stuff.

That said, Selenium is a relatively new technology, and it’s not without its issues. When building your first test you might find a lot of times where it’s a trial and error process. There are so many different ways to do the same test, it can be overwhelming. Often times, one or more of the ways you try won’t work. I’m going to try to list some of the common problems I ran into and tips I found below.

  • Selenium Commands
    • waitForElementPresent
      • this is will block your test proceeding until it finds the identified element.  It checks once a second for 30 seconds.
      • this was the most common way I dealt with ‘ajax’ type interactions where it takes an unknown period of time for something to show up
      • I also use it generally instead of verifyElementPresent – it does basically the same thing with a little wiggle room
    • mouseDown/mouseUp/mousePressed/click
      • mostly equivalent, but sometimes you need to match the desired event to a javascript handler
      • try click first.  If it doesn’t work the way you want, move on to mouseDown and so on.
    • waitForFrameToLoad/selectFrame
      • important if you use iFrames (modal dialog, etc.)
      • the selenium selectors only hit the current frame, otherwise you have to select the correct frame
      • an easy way to get back to the root window is to do selectFrame null
    • type vs. typeKeys
      • type fills out an input in code – if it works, use this.  You can use this, and then fire a single typeKeys for the last character if you need an event to be triggered.
      • typeKeys fires the key events on the element
        • has some idiosyncracies – certain letters (I’m looking at you, ‘y’) are reserved to do other special keypresses
        • necessary if you are using a wysiwyg ‘designmode’ type box instead of a standard input
    • verifyX vs. assertX
      • if verify fails, the test continues (and is marked as errored).  If assert fails, the test aborts.
      • Usually verify is better, unless one task blocks a future one from functioning correctly
    • runScript vs. Eval vs. Expression
      • runScript inserts the javascript you provide into the current frame/window.  Useful for those things selenium doesn’t support – like moving a cursor around and selecting text in a wysiwyg
      • Eval runs javascript in the context of selenium. Handy for complex checks – use waitForEval (for instance, checking the css background image property of a particular element)
        • Use this.browserbot.findeElement(“selenium selector”) to find elements the way selenium would
        • Use window.X To access the current frame/window context objects
      • Expression is similar to Eval, but uses Selenium’s custom expression format instead of javascript (but you can combine with javascript by using  javascript{}
        • storedVars[‘key’] allows you to get to a variable you created with a Selenium ‘store’ expression
    • selectPopUp
      • useful for checking stuff in a popup that was initiated
      • Easiest to get by the html title of the popup, but do a ‘pause’ first to let it load
  • Selenium Selectors and XPath
    • In general, be as abstract as possible.
      • Don’t select individual server generated ids (hand crafted html ids are ok if you don’t expect them to change)
      • Don’t select on complicated relationships ( /div[0]/div[2]/a[4] ) – your html structure will change and you’ll have to maintain it
      • Select links by the simple link=text when possible – easy to read/maintain, unlikely to change
      • Use //that (any decendant) instead of /this/that where possible
      • .  references ‘this’ element.  Helps to select something with a particular text:   //div[@id=’publish-private-shares’]//p[.=’This is pretty cool.’]
      • Contains() is useful if you don’t know the exact text (for instance, when an element has multiple css classes):     //div[@id=’pageContent’ and contains(@class,’contenteditable’) and h2=’Goals’]/p[1]
  • Selenium RC
    • While you can use Selenium IDE to create a c# version of your tests – if you do so, you have two tests to maintain.  You can run your ‘selenese’ tests directly with RC, too.
      • JAVAPATH\java.exe –jar SELENIUMPATH\selenium-server.jar –htmlSuite “*BROWSER” “BASESITEURL” “SUITEFILEPATH” “RESULTSFILEPATH”
      • I’ve written a simple csharp console project that automatically finds the correct javapath and fires up the test when you run it.  If people ask in the comments, I’ll post it.
    • Last I checked, Chrome and Safari-Windows don’t work.  Chrome is supposed to be fixed in Selenium RC 1.0.4
  • Sauce RC
    • This is a great UI to help test multiple browsers, but there are a couple of issues
      • Firefox works, but only in dual window mode
      • IE works, but only in single window mode.
      • The ‘timeout’ setting implies a default timeout per action in your test, but it is actually the timeout for your entire test run.  Since it defaults to 30 seconds, you’ll probably want to change it, or else your tests will suddenly die for no reason with no explanation/log.

I’m sure there is probably more I’ve forgotten, so leave a comment if you get stuck and I’ll try to help out if I can.

A simple Formatted ToolTip text on hover

The task was to add a formatted “ToolTip” message when hovering on a “More” link.  On a certain report, some of the names got pretty long.  Instead of wrapping text on the report, the desire was to simply truncate the name, then allow the user to see the entire name by hovering over the “More” link.  However, we wanted more than just the built-in ToolTip look.

I’ve seen JavaScript implementations of this, but I was looking for a simpler solution.  This is what I came up with:

The Mark-up

<td>
    <%# (Eval("Name").ToString().Length > 65) ? Eval("Name").ToString().Substring(0, 60) + "..." : Eval("Name")%>
    <span>
        <a href="#"><%# (Eval("Name").ToString().Length > 65) ? "More" : "" %></a>
        <span><%#Eval("Name")%></span>
    </span>
</td>

The CSS

.showonhover .hovertext { display: none;}
.showonhover:hover .hovertext {display: inline;}
a.viewdescription {color:#999;}
a.viewdescription:hover {background-color:#999; color: White;}
.hovertext {position:absolute;z-index:1000;border:1px solid #ffd971;background-color:#fffdce;padding:11px;width:150px;font-size: 0.75em;}

Comment

The key is the first two lines of the CSS, specifically hiding the .hovertext node until the mouse hovers over the .showonhover node.  This is a pretty simple solution, but it wasn’t immediately apparent to me, so I thought I’d share it with others who may have the same initial mental block that I had.

Web Application Functional Regression Testing Using Selenium

Add to FacebookAdd to DiggAdd to Del.icio.usAdd to StumbleuponAdd to RedditAdd to BlinklistAdd to TwitterAdd to TechnoratiAdd to Yahoo BuzzAdd to Newsvine

At Foliotek, we use a rapid development methodology.  Typically, a new item will go from definition through coding to release in a month’s time (bucketed along with other new items for the month).  A bugfix will nearly always be released within a week of the time it was reported.  In fact, we are currently experimenting with a methodology that will allow us to test and deploy new items individually as well – which means that a new (small) item can go from definition to release in as little as a week, too.

Overall, this kind of workflow is great for us, and great for our customers.  We don’t need to wait a year to change something to make our product more compelling, and customers don’t have to wait a year to get something they want implemented.  We also avoid the shock of suddenly introducing a year’s worth of development to all our customers all at once – a handful of minor changes every month (or week) is much easier to cope with.

However, it also means that Foliotek is never exactly the same as it was the week before.  Every time something changes, there is some risk that something breaks.   We handle this risk in two ways:

  1. We test extremely thoroughly
  2. We fix any problems that arise within about a week (severe problems usually the same day)

At first, we did all testing manually.  This is the best way to test, assuming you have enough good testers with enough time to do it well.  Good testers can’t be just anyone – they have to have a thorough knowledge of how the system should work, they have to care that it does work perfectly, and they have to have a feel for how they might try to break things.  Having enough people like this with enough time to do testing is expensive.

Over time two related things happened.  One was that we added more developers to the project, and started building more faster.  Two was that the system was growing bigger and more complex.

As more people developed on it and the system grew more complex, our testing needs grew exponentially.  The rise in complexity and people developing led to much, much more potential for side-effects – problems where one change affects a different (but subtly related) subsystem.  Side-effects by their nature are impossible to predict.  The only way to catch them was to test EVERYTHING any time ANYTHING changed.

We didn’t have enough experienced testers to do that every month (new development release) let alone every week (bugfix release).

To deal with that, we started by writing a manual regression test script to run through each week.  While this didn’t free up any time overall – it did mean that once the test was written well, anyone could execute it.  This was doable, because we had interns who had to be around to help handle support calls anyways – and they were only intermittently busy.  In their free time they could execute the tests.

Another route we could have gone would have been to write automated unit tests (http://en.wikipedia.org/wiki/Unit_testing).  Basically, these are tiny contracts the developers would write that say something like “calling the Add function on the User class with name Luke will result in the User database table having a new row with name Luke”.  Each time the project is built, the contracts are verified.  This is great for projects like code libraries and APIs where the product of the project IS the result of each function.  For a web application, though, the product is the complex interaction of functions and how they produce an on screen behavior.  There are lots of ways that the individual functions could all be correct and the behavior still fails.  It is also very difficult to impossible to test client-side parts of a web application – javascript, AJAX, CSS, etc.  Unit testing would cost a non trivial amount (building and maintaining the tests) for a trivial gain.

Eventually, we discovered the Selenium project (http://seleniumhq.org/download/).  The idea of Selenium is basically to take our manual regression test scripts, and create them such that a computer can automatically run the tests in a browser (pretty much) just like a human tester would.  This allows us to greatly expand our regression test coverage, and run it for every single change we make and release.

Here are the Selenium tools we use and what we use them for:

  • Selenium IDE (http://release.seleniumhq.org/selenium-ide/) : A Firefox plugin that lets you quickly create tests using a ‘record’ function that builds it out of your clicks, lets you manually edit to make your tests more complex, and runs them in Firefox.
  • Selenium RC (http://selenium.googlecode.com/files/selenium-remote-control-1.0.3.zip):  A java application that will take the tests you create with Selenium IDE, and run them in multiple browsers (firefox, ie, chrome, etc).  It runs from the command line, so its fairly easy to automate test runs into build actions/etc as well.
  • Sauce RC (http://saucelabs.com/downloads): A fork of RC that adds a web ui on top of the command line interface.  It’s useful for quickly debugging tests that don’t execute properly in non-firefox browsers.  It also integrates with SauceLabs – a service that lets you run your tests in the cloud on multiple operating systems and browsers (for a fee).
  • BrowserMob (http://browsermob.com/performance-testing): An online service that will take your selenium scripts and use them to generate real user traffic on your site.  Essentially, it spawns off as many real machines and instances of FireFox at once to run your test – each just as you would do locally – for a fee.  It costs less than $10 to test up to 25 “real browser users” – which actually can map to many more users than that since the automated test doesn’t have to think between clicks.  It gets expensive quickly to test more users than that.

Selenium is a huge boon for us.  We took the manual tests that would occupy a tester for as much as a day, and made it possible to run those same tests with minimal interaction in a half hour or less.  We’ll be able to cover more test cases, and run it more – even running them as development occurs to catch issues earlier.

In my next post, I’ll talk about the details of how you build tests, run them, maintain them, etc. with the tools mentioned above.

Windows Batch Files: ‘@echo is not recognized’

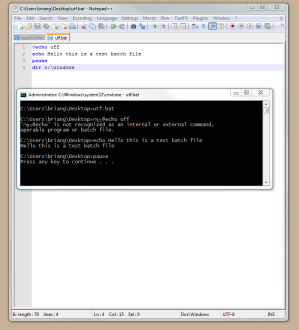
Today, after loading up a publish script and running it, I got a strange error:  '*** @echo' is not recognized as an internal or external command, operable program or batch file. It then continued to run each line individually, throwing errors on basically every line.

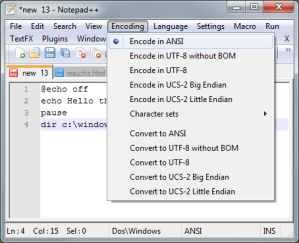
After playing around with creating a brand new empty file, and getting the same error – I realized the problem. The encoding was set to UTF-8, which the Windows command line failing on.

To fix it, just set your encoding to ANSI. Here is a screenshot of how to do that with Notepad++:

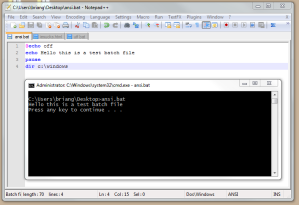
And now, everything works wonderfully and I can get back to work:

Extended CheckBoxList Control

A common task in programming is to retrieve all of the selected items or values from a CheckBoxList control. It is unfortunate that no native properties provide this already. However, extending the CheckBoxList to provide these is simple enough.

The extension I created provides four new properties:

  • SelectedValuesString – A comma-delimited string of the selected values.
  • SelectedValuesAsIntegers – An Integer List of the selected values.
  • SelectedValuesAsStrings – A string List of the selected values.
  • SelectedItemTextAsStrings – A string list of the text for the selected items.
public class ExtendedCheckBoxList : CheckBoxList
{
    public string SelectedValuesString
    {
        get
        {
            return String.Join(",",SelectedValuesAsStrings);
        }
    }

    public IEnumerable SelectedValuesAsIntegers
    {
        get
        {
            int temp;
            return this.Items.Cast<ListItem>()
                 .Where(i => i.Selected && int.TryParse(i.Value,out temp)).Select(i => int.Parse(i.Value));
        }
    }
    public IEnumerable SelectedValuesAsStrings
    {
        get
        {
            return this.Items.Cast<ListItem>().Where(i => i.Selected).Select(i=>i.Value);
        }
    }

    public IEnumerable SelectedItemTextAsStrings
    {
        get
        {
            return this.Items.Cast<ListItem>().Where(i => i.Selected).Select(i => i.Text);
        }
    }
}

Rename Applications and Virtual Directories in IIS7

Have you ever wondered why the box to change the name or “Alias” on an application or virtual directory is greyed out (see screenshot below)? I found a way to change the name without recreating all your settings. It uses the built in administration commands in IIS7, called appcmd.

Renaming Applications In IIS7

  1. Open a command prompt to see all of your applications.

    C:> %systemroot%\system32\inetsrv\appcmd list app
    
    	APP "Default Web Site/OldApplicationName"
    	APP "Default Web Site/AnotherApplication"
    
  2. Run a command like this to change your “OldApplicationName” path to “NewApplicationName”. Now you can use http://localhost/newapplicationname

    C:> %systemroot%\system32\inetsrv\appcmd set app "Default Web Site/OldApplicationName" -path:/NewApplicationName
    	
    	APP object "Default Web Site/OldApplicationName" changed
    

Renaming Virtual Directories In IIS7

  1. Open a command prompt to see all of your virtual directories.

    C:> %systemroot%\system32\inetsrv\appcmd list appcmd
    	
    	VDIR "Default Web Site/OldApplicationName/Images" (physicalPath:\\server\images)
    	VDIR "Default Web Site/OldApplicationName/Data/Config" (physicalPath:\\server\config)
    

    We want to rename /Images to /Images2 and /Data/Config to /Data/Config2. Here are the example commands:

    C:> %systemroot%\system32\inetsrv\appcmd set vdir "Default Web Site/OldApplicationName/Images" -path:/Images2
    	
    	VDIR object "Default Web Site/OldApplicationName/Images" changed
    	
    C:> %systemroot%\system32\inetsrv\appcmd set vdir "Default Web Site/OldApplicationName/Data/Config" -path:/Data/Config2
    	
    	VDIR object "Default Web Site/OldApplicationName/Data/Config" changed
    

Databinding Nested Repeaters

Many of you might already know about this, but I’ll post it for those of you like me who didn’t. Occasionally I’ll nest a repeater inside of another repeater, and when I do I always attach an ItemDataBound event handler to the parent repeater so I can set the DataSource of the child repeater.

<asp:Repeater ID="rptManufacturers" runat="server" OnItemDataBound="rptManufacturers_ItemDataBound">
    <ItemTemplate>
        <%# Eval("Name") %>
        <asp:Repeater runat="server" ID="rptModels">
            <HeaderTemplate>
                <ul>
            </HeaderTemplate>
            <ItemTemplate>
                <li><%# Eval("ModelName") %></li>
            </ItemTemplate>
            <FooterTemplate>
                </ul>
            </FooterTemplate>
        </asp:Repeater>
    </ItemTemplate>
</asp:Repeater>
protected void rptManufacturers_ItemDataBound(object sender, RepeaterItemEventArgs e)
{
        Manufacturer man = (Manufacturer)e.Item.DataItem;
        Repeater rptModels = (Repeater)e.Item.FindControl("rptModels");
 
        rptModels.DataSource = man.Models;
        rptModels.DataBind();
}

I always found it annoying that I had to create a ItemDataBound function when the only thing I needed to do was bind the child repeater. However, recently I found out you don’t need to bother with all the above code. You can just do this:

<asp:Repeater ID="rptManufacturers" runat="server">
    <ItemTemplate>
        <%# Eval("Name") %>
        <asp:Repeater runat="server" ID="rptModels" DataSource='<%# Eval("Models") %>'>
            <HeaderTemplate>
                <ul>
            </HeaderTemplate>
            <ItemTemplate>
                <li><%# Eval("ModelName") %></li>
            </ItemTemplate>
            <FooterTemplate>
                </ul>
            </FooterTemplate>
        </asp:Repeater>
    </ItemTemplate>
</asp:Repeater>

This is a really simple solution when the only thing you need to do is bind a child control ( Repeater, DataGrid, GridView, etc ). The solution doesn’t really apply if you need to do more logic on the ItemDataBound event.

Automatic Update of Datamodel In Linq

One of the issues that we came across fairly quickly when converting some projects to Linq was how unusable the default Linq to SQL utility was. The interface worked extremely well for 2 or 3 tables, but quickly became unmanageable with much more than that.

We began looking for other solutions, and discovered a command line utility called SQLMetal that can be used to generate a DataModel from a connection string and/or an XML file.

The solution we settled on uses SQLMetal to generate XML markup from the database, then uses XSL Transformations to make desired property/model changes (Private properties, Delay loaded, etc), and then uses SQLMetal to generate a code file from this XML file.

To start, we created a batch file called updateModel.bat and placed it in the project:

"C:\Program Files\Microsoft SDKs\Windows\v6.0A\bin\SQLMetal.exe" /conn:"CONNECTIONSTRING" 
      /timeout:0 /namespace:MODELNAMESPACE /context:DATACONTEXTNAME /language:csharp /pluralize 
      /dbml:"%~dp0DataModel.dbml"
"%~msxsl.exe" "%~dp0DataModel.dbml" "%~dp0ModifyDbml.xslt" -o "%~dp0DataModel.dbml"
"C:\Program Files\Microsoft SDKs\Windows\v6.0A\bin\SQLMetal.exe" /code:"%~dp0DataModel.cs"
    /namespace:MODELNAMESPACE /context:DATACONTEXTNAME /language:csharp 
    /pluralize %DataModel.dbml

The output of SQLMetal in the first line of this file is an XML file called DataModel.dbml that looks something like this :

  <Table Name="dbo.Person" Member="Persons">
    <Type Name="Person">
      <Column Name="PersonID" Type="System.Int32" DbType="Int NOT NULL IDENTITY" IsPrimaryKey="true" IsDbGenerated="true" CanBeNull="false"></Column>
      <Column Name="AddressID" Type="System.Int32" DbType="Int NOT NULL" CanBeNull="false"></Column>
      <Column Name="Email" Type="System.String" DbType="VarChar(255) NOT NULL" CanBeNull="false"></Column
      <Column Name="NameFirst" Type="System.String" DbType="VarChar(255) NOT NULL" CanBeNull="false"></Column>
      <Column Name="NameLast" Type="System.String" DbType="VarChar(255) NOT NULL" CanBeNull="false"></Column>
<Association Name="FK_Person_Address" Member="Address" ThisKey="AddressID" OtherKey="AddressID" Type="Address" IsForeignKey="true"></Association>
    </Type>
  </Table>

The second line of this script uses a utility called msxsl.exe (note that this requires MSXML). This program uses a file called ModifyDbml.xslt to perform an XSL tranformation on the DataModel.dbml file.

<?xml version="1.0" encoding="utf-8"?>
<xsl:stylesheet version="1.0"
								xmlns:dbml="http://schemas.microsoft.com/linqtosql/dbml/2007"
								xmlns:xsl="http://www.w3.org/1999/XSL/Transform"
								xmlns:msxsl="urn:schemas-microsoft-com:xslt"
								exclude-result-prefixes="msxsl">
  <xsl:output method="xml" indent="yes"/>

  <xsl:template match="dbml:Database/dbml:Table/dbml:Type[@Name = 'Person']/dbml:Column[@Name = 'AddressID']">
    <xsl:copy>
      <xsl:apply-templates select="@* | node()" />
       <xsl:attribute name="AccessModifier">Private</xsl:attribute>
    </xsl:copy>
  </xsl:template>

<xsl:template match="@* | node()">
     <xsl:copy>
      <xsl:apply-templates select="@* | node()"/>
    </xsl:copy>
  </xsl:template>
</xsl:stylesheet>

This will make it so the “AddressID” property of “Person” is a private property – and this is where all such DataModel changes should be stored. Note that any changes made directly to the DataModel after this point will be lost each time the files are generated.

The final line of this script generates a DataModel.cs file from the updated XML file.

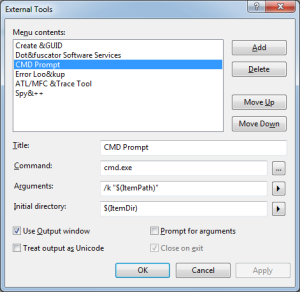
Finally, we looked for a way to call this script to update from within visual studio. To do this, we went to Tools -> External Tools -> Add, and used the following arguments:

This allows you to highlight the updateModel.bat from Visual Studio and go to “Tools->CMD Prompt” to update your DataModel.

bindWithDelay jQuery Plugin

Sometimes, I want to have a JavaScript event that doesn’t fire until the native event stops firing for a short timeout. I’ve needed to use that pattern in almost every project I have worked on.

For example, you want to use JavaScript to resize an iframe to 100% height when the window resizes. The resize() event can fire dozens of times, and calculating and setting the new height can slow down your page. I used to implement it like this:

var timeout;
function doResize(e) {
   clearTimeout(timeout);
   timeout = setTimeout(function() {
      // run some code
   }, 200);
}
$(function() {
   $(window).bind("resize",doResize);
});

Notice that there are extra variables that you have to deal with, and extra indentation. You could at least clean up the global variable using closures, but you get the idea.

I wrote a plugin to make this pattern easier, it is called “bindWithDelay”. The source code is online, as is a mini project page with a demo.

This is what the same code looks like with the plugin:

function doResize(e) {
      // run some code
}
$(function() {
   $(window).bindWithDelay("resize", doResize, 200);
})