Selenium Regression Testing Part II – Tips and Tricks

Add to FacebookAdd to DiggAdd to Del.icio.usAdd to StumbleuponAdd to RedditAdd to BlinklistAdd to TwitterAdd to TechnoratiAdd to Yahoo BuzzAdd to Newsvine

In my last post, I talked about how you can use Selenium to do real regressions tests for web applications. It’s a great way to automate testing the real user experience, and not just the backend stuff.

That said, Selenium is a relatively new technology, and it’s not without its issues. When building your first test you might find a lot of times where it’s a trial and error process. There are so many different ways to do the same test, it can be overwhelming. Often times, one or more of the ways you try won’t work. I’m going to try to list some of the common problems I ran into and tips I found below.

  • Selenium Commands
    • waitForElementPresent
      • this is will block your test proceeding until it finds the identified element.  It checks once a second for 30 seconds.
      • this was the most common way I dealt with ‘ajax’ type interactions where it takes an unknown period of time for something to show up
      • I also use it generally instead of verifyElementPresent – it does basically the same thing with a little wiggle room
    • mouseDown/mouseUp/mousePressed/click
      • mostly equivalent, but sometimes you need to match the desired event to a javascript handler
      • try click first.  If it doesn’t work the way you want, move on to mouseDown and so on.
    • waitForFrameToLoad/selectFrame
      • important if you use iFrames (modal dialog, etc.)
      • the selenium selectors only hit the current frame, otherwise you have to select the correct frame
      • an easy way to get back to the root window is to do selectFrame null
    • type vs. typeKeys
      • type fills out an input in code – if it works, use this.  You can use this, and then fire a single typeKeys for the last character if you need an event to be triggered.
      • typeKeys fires the key events on the element
        • has some idiosyncracies – certain letters (I’m looking at you, ‘y’) are reserved to do other special keypresses
        • necessary if you are using a wysiwyg ‘designmode’ type box instead of a standard input
    • verifyX vs. assertX
      • if verify fails, the test continues (and is marked as errored).  If assert fails, the test aborts.
      • Usually verify is better, unless one task blocks a future one from functioning correctly
    • runScript vs. Eval vs. Expression
      • runScript inserts the javascript you provide into the current frame/window.  Useful for those things selenium doesn’t support – like moving a cursor around and selecting text in a wysiwyg
      • Eval runs javascript in the context of selenium. Handy for complex checks – use waitForEval (for instance, checking the css background image property of a particular element)
        • Use this.browserbot.findeElement(“selenium selector”) to find elements the way selenium would
        • Use window.X To access the current frame/window context objects
      • Expression is similar to Eval, but uses Selenium’s custom expression format instead of javascript (but you can combine with javascript by using  javascript{}
        • storedVars[‘key’] allows you to get to a variable you created with a Selenium ‘store’ expression
    • selectPopUp
      • useful for checking stuff in a popup that was initiated
      • Easiest to get by the html title of the popup, but do a ‘pause’ first to let it load
  • Selenium Selectors and XPath
    • In general, be as abstract as possible.
      • Don’t select individual server generated ids (hand crafted html ids are ok if you don’t expect them to change)
      • Don’t select on complicated relationships ( /div[0]/div[2]/a[4] ) – your html structure will change and you’ll have to maintain it
      • Select links by the simple link=text when possible – easy to read/maintain, unlikely to change
      • Use //that (any decendant) instead of /this/that where possible
      • .  references ‘this’ element.  Helps to select something with a particular text:   //div[@id=’publish-private-shares’]//p[.=’This is pretty cool.’]
      • Contains() is useful if you don’t know the exact text (for instance, when an element has multiple css classes):     //div[@id=’pageContent’ and contains(@class,’contenteditable’) and h2=’Goals’]/p[1]
  • Selenium RC
    • While you can use Selenium IDE to create a c# version of your tests – if you do so, you have two tests to maintain.  You can run your ‘selenese’ tests directly with RC, too.
      • JAVAPATH\java.exe –jar SELENIUMPATH\selenium-server.jar –htmlSuite “*BROWSER” “BASESITEURL” “SUITEFILEPATH” “RESULTSFILEPATH”
      • I’ve written a simple csharp console project that automatically finds the correct javapath and fires up the test when you run it.  If people ask in the comments, I’ll post it.
    • Last I checked, Chrome and Safari-Windows don’t work.  Chrome is supposed to be fixed in Selenium RC 1.0.4
  • Sauce RC
    • This is a great UI to help test multiple browsers, but there are a couple of issues
      • Firefox works, but only in dual window mode
      • IE works, but only in single window mode.
      • The ‘timeout’ setting implies a default timeout per action in your test, but it is actually the timeout for your entire test run.  Since it defaults to 30 seconds, you’ll probably want to change it, or else your tests will suddenly die for no reason with no explanation/log.

I’m sure there is probably more I’ve forgotten, so leave a comment if you get stuck and I’ll try to help out if I can.

Rename Applications and Virtual Directories in IIS7

Have you ever wondered why the box to change the name or “Alias” on an application or virtual directory is greyed out (see screenshot below)? I found a way to change the name without recreating all your settings. It uses the built in administration commands in IIS7, called appcmd.

Renaming Applications In IIS7

  1. Open a command prompt to see all of your applications.

    C:> %systemroot%\system32\inetsrv\appcmd list app
    
    	APP "Default Web Site/OldApplicationName"
    	APP "Default Web Site/AnotherApplication"
    
  2. Run a command like this to change your “OldApplicationName” path to “NewApplicationName”. Now you can use http://localhost/newapplicationname

    C:> %systemroot%\system32\inetsrv\appcmd set app "Default Web Site/OldApplicationName" -path:/NewApplicationName
    	
    	APP object "Default Web Site/OldApplicationName" changed
    

Renaming Virtual Directories In IIS7

  1. Open a command prompt to see all of your virtual directories.

    C:> %systemroot%\system32\inetsrv\appcmd list appcmd
    	
    	VDIR "Default Web Site/OldApplicationName/Images" (physicalPath:\\server\images)
    	VDIR "Default Web Site/OldApplicationName/Data/Config" (physicalPath:\\server\config)
    

    We want to rename /Images to /Images2 and /Data/Config to /Data/Config2. Here are the example commands:

    C:> %systemroot%\system32\inetsrv\appcmd set vdir "Default Web Site/OldApplicationName/Images" -path:/Images2
    	
    	VDIR object "Default Web Site/OldApplicationName/Images" changed
    	
    C:> %systemroot%\system32\inetsrv\appcmd set vdir "Default Web Site/OldApplicationName/Data/Config" -path:/Data/Config2
    	
    	VDIR object "Default Web Site/OldApplicationName/Data/Config" changed
    

Databinding Nested Repeaters

Many of you might already know about this, but I’ll post it for those of you like me who didn’t. Occasionally I’ll nest a repeater inside of another repeater, and when I do I always attach an ItemDataBound event handler to the parent repeater so I can set the DataSource of the child repeater.

<asp:Repeater ID="rptManufacturers" runat="server" OnItemDataBound="rptManufacturers_ItemDataBound">
    <ItemTemplate>
        <%# Eval("Name") %>
        <asp:Repeater runat="server" ID="rptModels">
            <HeaderTemplate>
                <ul>
            </HeaderTemplate>
            <ItemTemplate>
                <li><%# Eval("ModelName") %></li>
            </ItemTemplate>
            <FooterTemplate>
                </ul>
            </FooterTemplate>
        </asp:Repeater>
    </ItemTemplate>
</asp:Repeater>
protected void rptManufacturers_ItemDataBound(object sender, RepeaterItemEventArgs e)
{
        Manufacturer man = (Manufacturer)e.Item.DataItem;
        Repeater rptModels = (Repeater)e.Item.FindControl("rptModels");
 
        rptModels.DataSource = man.Models;
        rptModels.DataBind();
}

I always found it annoying that I had to create a ItemDataBound function when the only thing I needed to do was bind the child repeater. However, recently I found out you don’t need to bother with all the above code. You can just do this:

<asp:Repeater ID="rptManufacturers" runat="server">
    <ItemTemplate>
        <%# Eval("Name") %>
        <asp:Repeater runat="server" ID="rptModels" DataSource='<%# Eval("Models") %>'>
            <HeaderTemplate>
                <ul>
            </HeaderTemplate>
            <ItemTemplate>
                <li><%# Eval("ModelName") %></li>
            </ItemTemplate>
            <FooterTemplate>
                </ul>
            </FooterTemplate>
        </asp:Repeater>
    </ItemTemplate>
</asp:Repeater>

This is a really simple solution when the only thing you need to do is bind a child control ( Repeater, DataGrid, GridView, etc ). The solution doesn’t really apply if you need to do more logic on the ItemDataBound event.

Automatic Update of Datamodel In Linq

One of the issues that we came across fairly quickly when converting some projects to Linq was how unusable the default Linq to SQL utility was. The interface worked extremely well for 2 or 3 tables, but quickly became unmanageable with much more than that.

We began looking for other solutions, and discovered a command line utility called SQLMetal that can be used to generate a DataModel from a connection string and/or an XML file.

The solution we settled on uses SQLMetal to generate XML markup from the database, then uses XSL Transformations to make desired property/model changes (Private properties, Delay loaded, etc), and then uses SQLMetal to generate a code file from this XML file.

To start, we created a batch file called updateModel.bat and placed it in the project:

"C:\Program Files\Microsoft SDKs\Windows\v6.0A\bin\SQLMetal.exe" /conn:"CONNECTIONSTRING" 
      /timeout:0 /namespace:MODELNAMESPACE /context:DATACONTEXTNAME /language:csharp /pluralize 
      /dbml:"%~dp0DataModel.dbml"
"%~msxsl.exe" "%~dp0DataModel.dbml" "%~dp0ModifyDbml.xslt" -o "%~dp0DataModel.dbml"
"C:\Program Files\Microsoft SDKs\Windows\v6.0A\bin\SQLMetal.exe" /code:"%~dp0DataModel.cs"
    /namespace:MODELNAMESPACE /context:DATACONTEXTNAME /language:csharp 
    /pluralize %DataModel.dbml

The output of SQLMetal in the first line of this file is an XML file called DataModel.dbml that looks something like this :

  <Table Name="dbo.Person" Member="Persons">
    <Type Name="Person">
      <Column Name="PersonID" Type="System.Int32" DbType="Int NOT NULL IDENTITY" IsPrimaryKey="true" IsDbGenerated="true" CanBeNull="false"></Column>
      <Column Name="AddressID" Type="System.Int32" DbType="Int NOT NULL" CanBeNull="false"></Column>
      <Column Name="Email" Type="System.String" DbType="VarChar(255) NOT NULL" CanBeNull="false"></Column
      <Column Name="NameFirst" Type="System.String" DbType="VarChar(255) NOT NULL" CanBeNull="false"></Column>
      <Column Name="NameLast" Type="System.String" DbType="VarChar(255) NOT NULL" CanBeNull="false"></Column>
<Association Name="FK_Person_Address" Member="Address" ThisKey="AddressID" OtherKey="AddressID" Type="Address" IsForeignKey="true"></Association>
    </Type>
  </Table>

The second line of this script uses a utility called msxsl.exe (note that this requires MSXML). This program uses a file called ModifyDbml.xslt to perform an XSL tranformation on the DataModel.dbml file.

<?xml version="1.0" encoding="utf-8"?>
<xsl:stylesheet version="1.0"
								xmlns:dbml="http://schemas.microsoft.com/linqtosql/dbml/2007"
								xmlns:xsl="http://www.w3.org/1999/XSL/Transform"
								xmlns:msxsl="urn:schemas-microsoft-com:xslt"
								exclude-result-prefixes="msxsl">
  <xsl:output method="xml" indent="yes"/>

  <xsl:template match="dbml:Database/dbml:Table/dbml:Type[@Name = 'Person']/dbml:Column[@Name = 'AddressID']">
    <xsl:copy>
      <xsl:apply-templates select="@* | node()" />
       <xsl:attribute name="AccessModifier">Private</xsl:attribute>
    </xsl:copy>
  </xsl:template>

<xsl:template match="@* | node()">
     <xsl:copy>
      <xsl:apply-templates select="@* | node()"/>
    </xsl:copy>
  </xsl:template>
</xsl:stylesheet>

This will make it so the “AddressID” property of “Person” is a private property – and this is where all such DataModel changes should be stored. Note that any changes made directly to the DataModel after this point will be lost each time the files are generated.

The final line of this script generates a DataModel.cs file from the updated XML file.

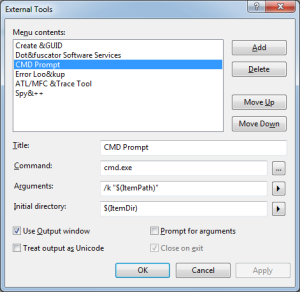
Finally, we looked for a way to call this script to update from within visual studio. To do this, we went to Tools -> External Tools -> Add, and used the following arguments:

This allows you to highlight the updateModel.bat from Visual Studio and go to “Tools->CMD Prompt” to update your DataModel.

Threading with Impersonation in an ASP.NET Project

Add to FacebookAdd to DiggAdd to Del.icio.usAdd to StumbleuponAdd to RedditAdd to BlinklistAdd to TwitterAdd to TechnoratiAdd to Yahoo BuzzAdd to Newsvine

Every once in a while, you might run into a need to do something that takes some time in a web app, but doesn’t require user interaction. Maybe you are processing an uploaded file (rescaling images, unzipping, etc). Maybe you are rewriting some statistical data based on new posts. Basically, something that takes minutes or hours – but isn’t that important to be interactive with the user.

You could set up a “job” in a database to be run the next time your timer runs (see https://lanitdev.wordpress.com/2010/03/16/running-a-scheduled-task/). If you don’t have a timer yet, though, that can be overkill if you don’t care that multiple jobs may run at once.

In my case, I needed to export a large volume of data to a zip file. I asked up front for an email address – and the user will receive a link to the completed zip in an email later. The job would only be performed by admins, and even then only about once a year – so there was no need to schedule the job – I could just fire it off when the user requested it.

Any easy way to do this is to use the .NET threading objects in System.Threading. Because I need to save a file, I also have one additional issue – Threads don’t automatically run under the same account that the site does, so I had to include code to impersonate a user that has write permissions.

Here’s a bit of code to get you started:

// param class to pass multiple values
private class ExportParams
        {
            public int UserID { get; set; }
            public string Email { get; set; }
            public string ImpersonateUser { get; set; }
            public string ImpersonateDomain { get; set; }
            public string ImpersonatePassword { get; set; }
        }

        protected void btnExport_Click(object sender, EventArgs e)
        {
//  .... code to get current app user, windows user to impersonate .....

            Thread t = new Thread(new ParameterizedThreadStart(DoExport));
            t.Start(new ExportParams(){
                UserID=CurrentUserID,
                Email=txtEmail.Text,
                ImpersonateUser = username,
                ImpersonateDomain = domain,
                ImpersonatePassword = password
            });
             // show user 'processing' message .....
         }

        private void DoExport(object param)
        {
            ExportParams ep = (ExportParams)param;

            using(var context = Security.Impersonate(ep.ImpersonateUser , ep.ImpersonateDomain,
             ep.ImpersonatePassword ))
          {
            // do the work here..............
          }
        }

Here’s the relevant part of the Security class that does the impersonation:

using System.Runtime.InteropServices;
using System.Security.Principal;
// .....
public class Security {
//.............
public const int LOGON_TYPE_INTERACTIVE = 2;
        public const int LOGON_TYPE_PROVIDER_DEFAULT = 0;
        // Using this api to get an accessToken of specific Windows User by its user name and password
        [DllImport("advapi32.dll", CharSet = CharSet.Unicode, SetLastError = true)]
        static public extern bool LogonUser(string userName, string domain, string passWord, int logonType, int logonProvider, ref IntPtr accessToken);

        public static WindowsImpersonationContext Impersonate()
        {
            return Impersonate("DEFAULT_USER","DEFAULT_DOMAIN","DEFAULT_PASSWORD");
        }
        public static WindowsImpersonationContext Impersonate(string username, string domain, string password)
        {
            IntPtr accessToken = IntPtr.Zero;
            //accessToken.Debug();
            var success = LogonUser(username, domain, password, LOGON_TYPE_INTERACTIVE, LOGON_TYPE_PROVIDER_DEFAULT, ref accessToken);

            //accessToken.Debug();
            if (!success)
                return null;

            WindowsIdentity identity = new WindowsIdentity(accessToken);

            return identity.Impersonate();
        }
// ..........
}

Radio button within a repeater problem

Recently I was developing a system to create tests and test questions.  For these tests our client wanted multiple choice questions.  To implement this I decided to have a list of textboxes for the answer text, and a radio button for each textbox to select the correct answer.   I knew that a RadioButtonList couldn’t have anything other than a radio button and text, so I went with a repeater.

<asp:Repeater ID="rptRadios" runat="server">
    <HeaderTemplate>
        <ul>
    </HeaderTemplate>
    <ItemTemplate>
        <li>
            <asp:RadioButton ID="rbRadio" runat="server" GroupName="RadioGroup" />
            &nbsp;
            <asp:TextBox runat="server" ID="txtRadio"></asp:TextBox>
        </li>
    </ItemTemplate>
    <FooterTemplate>
        </ul>
    </FooterTemplate>
</asp:Repeater>

Doing it this way caused the group name of each radio button to be inconsistent, because of the repeater. After a while of researching and not finding any good solutions I decided to try changing the group name of the radio buttons using jQuery.

$("input:radio").attr('name', 'RadioGroup');

That gave me the radio button functionality that I wanted, but it prevented me from getting the selected radio button on postback. So I decided to just implement the radio button functionality manually.

var radios = $("input:radio");
radios.click(function() {
     radios.removeAttr('checked');
     $(this).attr('checked', 'checked');
     return true;
});

Which gave me the correct functionality and I could still get the selected radio button and textbox on postback. Probably not the most elegant solution, but I couldn’t find any other way to do it.

Also I needed to make sure at least one of the radio buttons was selected so I added a CustomValidator that called a javascript function.

function ValidateRadioButtons(sender, args) {
     args.IsValid = $("input:radio:checked").size() > 0;
}

Integrating Bing Search Results Within A Web App Using .NET

Add to FacebookAdd to DiggAdd to Del.icio.usAdd to StumbleuponAdd to RedditAdd to BlinklistAdd to TwitterAdd to TechnoratiAdd to Yahoo BuzzAdd to Newsvine

A few months ago I was faced with the challenge of including a site search in a web system we maintain.

The main goals for the search tool were meaningful results, ease of use, and low cost of implementation.

After evaluating the search offerings from Google, Bing and Yahoo we went with Bing. Microsoft offers high flexibility and no fees for using the Bing Search API. The only thing they request is that you show some type of image or statement crediting Bing with the search results.

The Bing Search API is part of Project Silk Road it offers many options for choosing the source type and output protocol (JSON, SOAP, XML) as well as flexible presentation options (No restrictions on ordering and blending of result). This allows you to integrate custom results with the Bing results without violating the usage terms.

Below are some code snippets to reference:

Retrieves the XML document containing search results from Bing and loads them into an object collection.

public BingSearchResult(string title, string description, string url)
{
     this.Title = title;
     this.Description = description;
     this.Url = url;
}

private static BingSearchResultCollection GetResults(string searchQuery, int pageNum, int resultsPerPage)
{
int offset = ((pageNum - 1) * resultsPerPage);

string url = "http://api.search.live.net/xml.aspx?Appid={0}&sources={1}&query={2}&{1}.count={3}&{1}.offset={4}";
string completeUri = String.Format(url, appID, "web", "site:www.yoursite.org " + searchQuery, resultsPerPage, offset);

HttpWebRequest webRequest = null;
HttpWebResponse webResponse = null;
XmlReader xmlReader = null;
webRequest = (HttpWebRequest)WebRequest.Create(completeUri);
webResponse = (HttpWebResponse)webRequest.GetResponse();
            
//Handles an invalid xml document
try
{
    xmlReader = XmlReader.Create(webResponse.GetResponseStream());
}
catch (System.Security.SecurityException)
{
    return new BingSearchResultCollection();
}

XDocument xmlDoc = XDocument.Load(xmlReader);
            
//Loops through the results and creates BingSearchResult objects
if (GetElementsByName(xmlDoc, "SearchResponse").Any())
{
    XElement searchResponse = GetElementsByName(xmlDoc, "SearchResponse").First();
    if(GetElementsByName(searchResponse, "Web").Any())
    {
        XElement web = GetElementsByName(searchResponse, "Web").First();
        if (GetElementsByName(web, "Total").Any())
        {
                        
            int totalResults = Convert.ToInt32(GetElementsByName(web, "Total").First().Value);
            var list = new BingSearchResultCollection(totalResults, searchQuery);

            if (GetElementsByName(web, "Results").Any())
            {
                XElement results = GetElementsByName(web, "Results").First();
                if (GetElementsByName(web, "Results").Any())
                {
                    if (GetElementsByName(results, "WebResult").Any())
                    {
                        var webResults = GetElementsByName(results, "WebResult");

                        foreach (XElement el in webResults)
                        {
                            string resTitle = "";
                            string resUrl = "";
                            string resDescr = "";
                            if (GetElementsByName(el, "Title").Any())
                                resTitle = GetElementsByName(el, "Title").First().Value;
                            if (GetElementsByName(el, "Url").Any())
                                resUrl = GetElementsByName(el, "Url").First().Value;
                            if (GetElementsByName(el, "Description").Any())
                                resDescr = GetElementsByName(el, "Description").First().Value; ;

                            if (IsValidUrl(resUrl))
                                list.Add(new BingSearchResult(resTitle, resDescr, resUrl));
                        }

                        return list;
                    }
                }
            }
        }
    }
}

return new BingSearchResultCollection();
}

private static IEnumerable<XElement> GetElementsByName(XContainer cont, String name)
{
     return (from el in cont.Elements()
          where el.Name.LocalName == name
          select el);
}

The reason I ended up using a custom LINQ function to traverse the tree was because I couldn’t figure out how to get a collection of WebResult elements.

The XML document returned from Bing is structured like this:

<?xml version="1.0" encoding="utf-8" ?> 
<?pageview_candidate ?> 
<SearchResponse xmlns="http://schemas.microsoft.com/LiveSearch/2008/04/XML/element" Version="2.2">
     <Query>
          <SearchTerms>site:www.yoursite.com SearchTerm</SearchTerms> 
     </Query>
     <web:Web xmlns:web="http://schemas.microsoft.com/LiveSearch/2008/04/XML/web">
     <web:Total>1350000</web:Total> 
     <web:Offset>0</web:Offset> 
     <web:Results>
          <web:WebResult>
               <web:Title>Result Title</web:Title> 
               <web:Description>Description of Result</web:Description> 
               <web:Url>http://www.resulturl.com</web:Url> 
               <web:CacheUrl>http://cc.bingj.com/cache.aspx?somecashobjecthere</web:CacheUrl> 
               <web:DisplayUrl>www.resulturl.com</web:DisplayUrl> 
               <web:DateTime>2010-07-02T20:27:32Z</web:DateTime> 
         </web:WebResult>
     </web:Results>
     </web:Web>
</SearchResponse>

Hopefully this gives you an idea of what you need to hit the floor running when implementing the Bing Search API in your project(s).

Here are some helpful resources:
http://www.bing.com/developers/
http://www.bing.com/developers/s/API%20Basics.pdf

If you need a powered by Bing image you can use the one I created here.

Controlling IIS7 With Custom Build Script

Handling IIS after doing a publish was always a bit of a pain.

We use Web Deployment Projects which automates much of the build process, such as minifying CSS and JavaScript and copying new files to the web servers. But we still had to deal with the pain of manually controlling IIS after a publish. This actually required remoting into the servers, and changing the home directories of the site in IIS.

This was always a small headache, but if we only published once a month or so, it wasn’t a big deal. A few months ago, we started doing weekly releases in Foliotek, our assessment portfolio tool to take care of any problems that customers were having on the live site.

Here is what we used to do:

  1. Build the WebDeploy project in ‘release’ mode. This will copy files to a StagingWeb folder on both servers.
  2. Load up the staging website (which is hosted on Server1 and pointing directly at the StagingWeb folder). Verify any fixes.
  3. (Here is the annoying part): Remote into both servers, and open IIS Manager. At approximately the same time, switch the home folder over to StagingWeb and make sure the site is still up. Back up the Web folder, delete it and copy StagingWeb then rename the copy to Web. Point IIS back to the Web folder.

We have extra steps in part 3 to prevent any downtime, but it is tedius and prone to error, timing problems, etc. And it is not something to look forward to at the start of the week. Why should we do something manually that should be easy to automate?

Here is what we do now:

  1. Build the WebDeploy project in ‘release’ mode. This will copy files to a StagingWeb folder on both servers.
  2. Load up the staging website (which is hosted on Server1 and pointing directly at the StagingWeb folder). Verify any fixes.
  3. Run a batch script to handle backups and switching IIS

The solution uses the PsExec utility which allows remote execution of batch scripts, and the AppCmd.exe command line tool for managing IIS7.

It is just a couple of batch scripts. You can call them on the command line, or through MSBuild. We actually have a Windows Forms project that gets run on the AfterBuild event of our Web Deployment project. This executable has links to all of the sites, shortcuts to remote desktop, status of the servers, and a link to the publish script.

Run it using this command:

publish_server_connector.bat \\Server1
publish_server_connector.bat \\Server2

The source code is below. It would probably need to be modified for different environments, and I’m sure there are better ways to handle this problem, at least this is simple to read and modify.

publish_server_connection.bat

This file basically just calls PSExec on the given server passing up the myproject_publish.bat script.

@ECHO off
SETLOCAL 

REM Publish Connection Script
REM This will call the publish.bat script on the server specified in the first argument
REM Usage: publish_server_connection.bat [servername]

SET server="%1"
SET server_dir="%1\c$\inetpub\wwwroot\MyProject"
SET psexec="%~dp0psexec.exe"
SET publish="%~dp0myproject_publish.bat"
SET usage=USAGE: publish_server_connection.bat [servername]

if not exist %server_dir% (
	ECHO ERROR: The path %server_dir% does not exist!  Exiting..
	ECHO %usage%
	GOTO End
)
if not exist %psexec% (
	echo ERROR: Could Not Find PSEXEC at path: %psexec%
	GOTO End
)
if not exist %publish% (
	echo ERROR: Could Not Find PUBLISH at path: %publish%
	GOTO End
)

ECHO Starting publish on %server%.
%psexec% %server% -c -v %publish%

if ErrorLevel 1 (
	ECHO.
	ECHO ERROR: Having problems starting PSExec.  Please verify access to the server, and retry.
	ECHO If the problem persists, then you will need to manually publish.
	ECHO.
)

:End

ENDLOCAL

myproject_publish.bat

This file will be copied to the servers using PSExec, and will be executed locally in the server environment.

@ECHO off
SETLOCAL 

REM Publish Script
REM This is called from development machines, using the PSExec Command.

CLS
ECHO.
ECHO =======================================================
ECHO Build Script.
ECHO %COMPUTERNAME%
ECHO This script will:
ECHO    1. Point the IIS entry for the LIVE website to StagingWeb
ECHO    2. Backup the original Web folder
ECHO    3. Copy StagingWeb over the original Web folder
ECHO    4. Point the IIS entry to the new Web folder
ECHO =======================================================
Echo.
ECHO Make sure you go to the staging site and confirm it is ready to go live.

For /f "tokens=2-4 delims=/ " %%a in ('date /t') do (SET startdate=%%c-%%a-%%b)
For /f "tokens=1-2 delims=/:" %%a in ("%TIME%") do (SET starttime=%%a%%b)

SET livedir="C:\inetpub\wwwroot\MyProject\Web"
SET stagingdir="C:\inetpub\wwwroot\MyProject\StagingWeb"
SET livedir_revert="C:\inetpub\wwwroot\MyProject\WebRevert"
SET backupdir="C:\inetpub\wwwroot\MyProject\backups\%startdate%_%starttime%"
SET appcmd="C:\Windows\System32\inetsrv\appcmd.exe"
SET appcmd_change=%appcmd% set vdir "MyProject/" -physicalPath:%stagingdir%
SET appcmd_revert=%appcmd% set vdir "MyProject/" -physicalPath:%livedir%

IF NOT EXIST %livedir% (
	ECHO Could not find path %livedir% on %COMPUTERNAME%
	GOTO End
)
IF NOT EXIST %stagingdir% (
	ECHO Could not find path %stagingdir% on %COMPUTERNAME%
	GOTO End
)

Choice /M "Are you ready to start?"
If Errorlevel 2 GOTO End REM Only proceed if ready, exit if user types "N"

ECHO.
ECHO Pointing website at the StagingWeb folder...

CALL %appcmd_change%
If Errorlevel 1 GOTO IISError

ECHO New site is live
ECHO.

Choice /M "Does the site still work?  If NO, IIS will be reverted."
If Errorlevel 2 GOTO Revert

GOTO Backup


:Backup
	ECHO Starting Web Backup to archives folder, and WebRevert in case you need to revert changes.
	if exist %livedir_revert% (
		rmdir %livedir_revert% /s /q
	)
	xcopy %livedir% %backupdir%\ /E /Y /q
	xcopy %livedir% %livedir_revert%\ /E /Y /q

	ECHO.
	ECHO Removing old Web folder and copying StagingWeb to Web.
	rmdir %livedir% /s /q
	xcopy %stagingdir% %livedir%\ /E /Y /q
	
	If Errorlevel 1 GOTO BackupError
	
	ECHO.
	ECHO Backup path is: %backupdir%
	ECHO Backup Success!  Resetting IIS to the Web/ folder...
	
	REM Reset IIS to Web/ (which is copied from StagingWeb/)
	CALL %appcmd_revert%
	If Errorlevel 1 GOTO IISError
	
	ECHO.
	ECHO Great job!  Now published on %COMPUTERNAME%.  Don't forget to set the other live web servers!
	GOTO End

:BackupError
	ECHO IMPORTANT: There was an error backing up the files.
	ECHO This could be caused by lack of permissions when trying to remove the old Web directory, if IIS has a lock on the folder.
	ECHO Don't worry, the live site should still be ok, but you will need to manually remote into the server to sort out the backups.
	GOTO End

:IISError
	ECHO IMPORTANT: There was an error switching IIS over (error code = %ErrorLevel%)
	ECHO Please manually remote into the server to sort things out.
	GOTO End

:Revert
	echo Resetting to the original Web folder...
	CALL %appcmd_revert%
	If Errorlevel 1 GOTO IISError
	GOTO End
	
:End

ENDLOCAL

Using the Web.Config connection string with LINQ to SQL

When updating a project to use LINQ to SQL, I found an issue with deploying to multiple environments.  Each environment (development, staging, live) had its’ own database associated with this.  Since I had the .dbml in another assembly, it was only reading from the app.config in the assembly it resided in.  I was storing the database connection string in the web.config of the project so I thought it would be nice to just use that instead of the app.config.

The first thing I needed to do was to keep the .dbml file from reading from the app.config.  After opening up the .dbml file, I opened the properties window for the file.  In the properties window, there is a setting for “Connection”.  In the “Connection” dropdown I selected the “(None)” selection.  That keeps the .dbml file from accessing the app.config for the database connection string.


The "Connection" setting in the .dbml Properties

Now I needed to get my MainDataContext to use the Web.Config connection string.  For this I created a partial class for my MainDataContext and created a constructor that passed the connection string from the Web.Config.

public partial class MainDataContext
{
    public MainDataContext()
        : base(System.Configuration.ConfigurationManager.ConnectionStrings["Database.connection.string.from.web.config"].ToString(), mappingSource)
    {
        OnCreated();
    }
}

Now when I deploy to different environments the .dbml file is accessing the correct database instead of the same one from the app.config.

Handy ASP.NET Debug Extension Method

Add to FacebookAdd to DiggAdd to Del.icio.usAdd to StumbleuponAdd to RedditAdd to BlinklistAdd to TwitterAdd to TechnoratiAdd to Yahoo BuzzAdd to Newsvine

Most of the programmers I know (myself included) don’t bother with the built in Visual Studio debugging tools. They are slow and resource intensive. Usually, its more efficient to just do one or more Response.Write calls to see key data at key steps.

That can be a hassle, though. Most objects don’t print very well. You have to create a loop or write some LINQ/String.Join to write items in a collection.

Inspiration struck – couldn’t I write an extension method on object to write out a reasonable representation of pretty much anything? I could write out html tables for lists with columns for properties, etc.

Then I thought – I love the javascript debug console in firebug. I can drill down into individual items without being overwhelmed by all of the data at once. Why not have my debug information spit out javascript to write to the debug console? That also keeps it out of the way of the rest of the interface.

Here’s the code:

public static void Debug(this object value)
        {
            if (HttpContext.Current != null)
            {
                HttpContext.Current.Response.Debug(value);
            }

        }

        public static void Debug(this HttpResponse Response, params object[] args)
        {

            new HttpResponseWrapper(Response).Debug(args);
        }
        public static void Debug(this HttpResponseBase Response, params object[] args)
        {

            ((HttpResponseWrapper)Response).Debug(args);
        }
        public static void Debug(this HttpResponseWrapper Response, params object[] args)
        {

            if (Response != null && Response.ContentType == "text/html")
            {
                Response.Write("<script type='text/javascript'>");
                Response.Write("if(console&&console.debug){");

                Response.Write("console.debug(" +
                              args.SerializeToJSON() +
                               ");");
                Response.Write("}");
                Response.Write("</script>");
            }
        }

The various overloads allow:

myObject.Debug();
new {message="test",obj=myObject}.Debug();
Response.Debug("some message",myObject,myObject2);
//etc

The only other thing you’ll need is the awesome JSON.NET library for the .SerializeToJSON() call to work (which turns the .NET object into the form javascript can deal with). Get it here. FYI, the library does choke serializing some complex objects, so occasionally you’ll need to simplify before calling debug.